功能
这是一个在线的应用,用来短时间存储一些信息,以实现在不同设备上共享这些信息的功能。其实目的就是可以将手机上的一些信息快速的复制到电脑上,尤其是在使用Linux系统的时候。下面是该应用的截图。其中阅后即焚是指信息被访问一次之后就会被销毁。
流程
程序主要的流程就是首先在文本框中输入或者粘贴一些内容,然后保存到服务器(使用的是新浪sae),保存成功之后会返回给客户端一个编号,通过该编号就可以访问存储的内容。因为就是为了给手机和电脑之间的复制粘贴提供一个介质,所以信息的有效时间暂时设为了2分钟,2分钟之后就会清除保存的信息。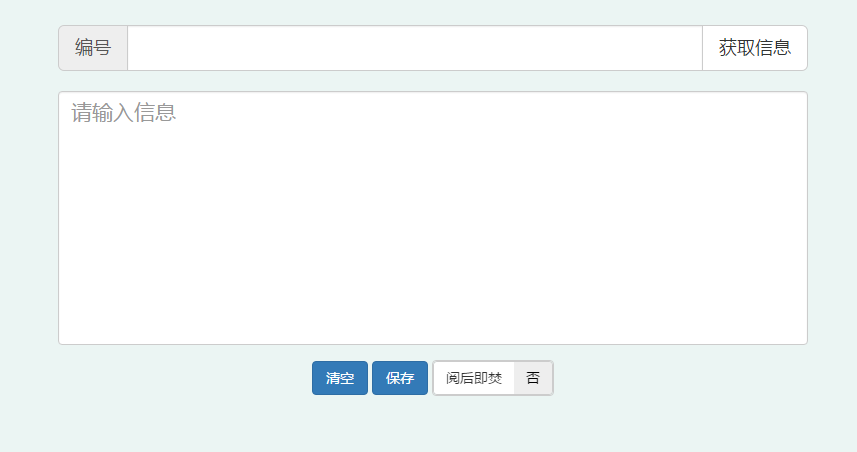
前端实现
整体风格
程序使用的是bootstrap框架,如果你还没有用过这个前端框架,那么强烈推荐你试用一下,因为使用该框架可以极大的减少你的工作量,并且兼容手机设备。下面是页面的主要html代码,其中css样式几乎全部为bootstrap定义的样式,这样我们就可以将更多的时间放在功能实现,而不是网页设计上。1
2
3
4
5
6
7
8
9
10
11
12
13
14
15
16
17
18
19
20
21
22
23
24
25
26
27
28
29
30
31
32
33
34<div class="container ">
<div class="row ">
<div style="padding:10px; ">
<form class="bs-example bs-example-form" role="form">
<div class="col-lg-12">
<div class="input-group input-group-lg">
<span class="input-group-addon">编号</span>
<input type="text" class="form-control" id="textId">
<span class="input-group-btn">
<button class="btn btn-default" type="button" id="msgGet">获取信息</button>
</span>
</div>
<br>
<div class="form-group ">
<textarea class="form-control custom-control change_font" style="resize:none" rows="8"
placeholder="请输入信息" id="mainText"></textarea>
</div>
<div class="text-center">
<button type="button" class="btn btn-primary button_width" id="msgClear">清空</button>
<button type="button" class="btn btn-primary button_width2 " id="msgSave">保存</button>
<div class="bootstrap-switch ">
<input type="checkbox" name="onlyOne" data-label-text="阅后即焚" data-on-text="是"
data-off-text="否" onSwitchChange="changeOne">
</div>
</div>
</div>
</form>
</div>
</div>
</div>
bootstrap有自适应机制,页面内容的宽度会随浏览器窗口的大小改变而改变。但是在我们的页面中如果采用默认的自适应机制,就可能会造成在较宽的屏幕上输入框的宽度过大,从而使的页面看起来不美观。所以我们更改了一下其默认行为,当浏览器窗口宽度大于800px时,将网页内容的宽度固定为800px。实现方式很简单,加上下面的css代码即可。1
2
3
4
5@media screen and (min-width: 800px) {
.container {
width: 800px;
}
}
还有一点就是input的placeholder属性在较低的IE版本中不兼容,使用下面的js代码可以解决这个问题1
2
3
4
5
6
7
8
9
10
11
12
13
14
15
16
17
18
19
20
21
22
23
24
25
26
27
28
29
30
31
32
33
34
35
36var JPlaceHolder = {
//检测
_check: function () {
return 'placeholder' in document.createElement('input');
},
//初始化
init: function () {
if (!this._check()) {
this.fix();
}
},
//修复
fix: function () {
jQuery(':input[placeholder]').each(function (index, element) {
var self = $(this), txt = self.attr('placeholder');
self.wrap($('<div></div>').css({position: 'relative', zoom: '1', border: 'none', background: 'none', padding: 'none', margin: 'none'}));
var pos = self.position(), h = self.outerHeight(true), paddingleft = self.css('padding-left');
var holder = $('<span></span>').text(txt).css({position: 'absolute', left: pos.left, top: pos.top, height: h, lienHeight: h, paddingLeft: paddingleft, fontSize: '1.5em', color: '#aaa'}).appendTo(self.parent());
self.focusin(function (e) {
holder.hide();
}).focusout(function (e) {
if (!self.val()) {
holder.show();
}
});
holder.click(function (e) {
holder.hide();
self.focus();
});
});
}
};
//执行
jQuery(function () {
JPlaceHolder.init();
});
bootstrap开关切换插件
在选择”阅后即焚”功能的地方,我们使用了一个开关切换的插件——bootstrap switch,这里 是该插件的github地址,使用起来也十分简单,下面是一个简单的示例,更多的属性可以参考官方文档1
2
3
4
5
6
7
8
9
10
11
12
13
14
15
16
17
18
19
20
21
22
23
24
25
26
27
28
29
30
31
32
33
<html>
<head lang="en">
<meta charset="UTF-8">
<meta http-equiv="X-UA-Compatible" content="IE=edge">
<meta name="viewport" content="width=device-width, initial-scale=1">
<title>bootstrap switch demo</title>
<link rel="stylesheet" href="css/bootstrap3/bootstrap.min.css">
<link rel="stylesheet" href="css/bootstrap3/bootstrap-switch.min.css">
<script type="text/javascript" src="js/jquery.js"></script>
<script type="text/javascript" src="js/bootstrap.js"></script>
<script type="text/javascript" src="js/bootstrap-switch.min.js"></script>
<script type="text/javascript">
$(document).ready(function() {
$("[name='my-checkbox']").bootstrapSwitch();
$('input[name="my-checkbox"]').on('switchChange.bootstrapSwitch', function(event, state) {
console.log(this); // DOM element
console.log(event); // jQuery event
console.log(state); // true | false
});
});
</script>
</head>
<body>
<input type="checkbox" name="my-checkbox" data-on-text="是" data-off-text="否" checked>
</body>
</html>
效果图如下所示
信息提示
一般来说使用alert就可以实现弹窗提示的功能,但是各个浏览器的弹窗样式都不相同并且也不美观,这里使用了jQuery Toaster插件,效果如下图所示,这里 是github地址。
这个插件需要bootstrap 3.0+,不过使用起来更加方便,只需要引入一个jquery.toaster.js即可,下面是一个示例1
2
3
4
5
6
7
8
9
10
11
12
13
14
15
16
17
18
19
20
21
22
23
24
25
26
27
<html>
<head lang="en">
<meta charset="UTF-8">
<meta http-equiv="X-UA-Compatible" content="IE=edge">
<meta name="viewport" content="width=device-width, initial-scale=1">
<title>bootstrap toaster demo</title>
<link rel="stylesheet" href="css/bootstrap3/bootstrap.min.css">
<script type="text/javascript" src="js/jquery.js"></script>
<script type="text/javascript" src="js/bootstrap.js"></script>
<script type="text/javascript" src="js/jquery.toaster.js"></script>
</head>
<body>
<div>
<button id="open" class="btn btn-primary ">Click Me</button>
</div>
<script type="text/javascript">
$("#open").click(function () {
$.toaster({message: 'Your message here', title: 'Your Title', priority: 'danger'});
})
</script>
</body>
</html>
在默认情况下,弹窗出现的位置是在右上角,我们可以修改一下css样式使其出现在屏幕中间,不过要首先去jquery.toaster.js中,将下面的代码注释掉(大概90行附近),1
2
3
4
5
6
7
8'css' :
{
'position' : 'fixed',
'top' : '10px',
'right' : '10px',
'width' : '300px',
'zIndex' : 50000
}
下面是修改后的代码:1
2
3
4
5
6
7
8
9
10
11
12
13
14
15
16
17
18
19
20
21
22
23
24
25
26
27
28
29
30
31
32
33
34
35
36
37
38
39
40
41
42
43
44
45
46
47
48
49
50
51
52
53
54
55
56
57
58
59
60
61
<html>
<head lang="en">
<meta charset="UTF-8">
<meta http-equiv="X-UA-Compatible" content="IE=edge">
<meta name="viewport" content="width=device-width, initial-scale=1">
<title>bootstrap toaster demo</title>
<link rel="stylesheet" href="css/bootstrap3/bootstrap.min.css">
<script type="text/javascript" src="js/jquery.js"></script>
<script type="text/javascript" src="js/bootstrap.js"></script>
<script type="text/javascript" src="js/jquery.toaster.js"></script>
<style type="text/css">
@media screen and (min-width: 800px) {
.center_toaster {
right: 30%;
width: 40%;
}
}
@media screen and (min-width: 500px) and (max-width: 799px) {
.center_toaster {
right: 20%;
width: 60%;
}
}
@media screen and (min-width: 200px ) and (max-width: 499px) {
.center_toaster {
right: 5%;
width: 90%;
}
}
</style>
</head>
<body>
<div>
<button id="open" class="btn btn-primary ">Click Me</button>
</div>
<script type="text/javascript">
$.toaster({
settings: {
'toaster': {
'class': 'center_toaster',
'css': {
'position': 'fixed',
'top': '2px',
'zIndex': 50000
}
}
}
});
$("#open").click(function () {
$.toaster({message: 'Your222 message here', title: 'Your Title', priority: 'danger'});
})
</script>
</body>
</html>
不过按上面修改之后在低于IE9的浏览器中工作并不理想,可能是IE9以下对 @media 支持不太好,所以在js的代码中加了一个判断,如果浏览器支持html5的一些特性(使用jquery判断)就使用toaster,否则使用alert。1
2
3
4
5if ($.support.leadingWhitespace) {
$.toaster({ priority: 'warning', title: '警告', message: '编号不能为空'});
} else {
alert("警告:编号不能为空");
}
Loading插件
当用户点完获取数据或者保存按钮时,会弹出一个正在加载的弹出层,防止由于网络延迟等原因造成用户重复点击,下面是效果图
这里 是github地址。下面是一个简单的示例:1
2
3
4
5
6
7
8
9
10
11
12
13
14
15
16
17
18
19
20
21
22
23
24
25
26
27
28
29
30
31
<html>
<head lang="en">
<meta charset="UTF-8">
<meta http-equiv="X-UA-Compatible" content="IE=edge">
<meta name="viewport" content="width=device-width, initial-scale=1">
<title>bootstrap watingDialog demo</title>
<link rel="stylesheet" href="css/bootstrap3/bootstrap.min.css">
<script type="text/javascript" src="js/jquery.js"></script>
<script type="text/javascript" src="js/bootstrap.js"></script>
<script type="text/javascript" src="js/bootstrap-waitingfor.js"></script>
</head>
<body>
<div>
<button id="open" class="btn btn-primary ">Click Me</button>
</div>
<script type="text/javascript">
$("#open").click(function () {
waitingDialog.show();
setTimeout(function() {
waitingDialog.hide();
},2000);
})
</script>
</body>
</html>
底部固定
当页面内容的高度小于屏幕的高度时,将footer固定在底部,当页面内容的高度大于屏幕高度时,footer会随着滚动条滚动,不会遮盖到正常的内容,下面一个解决方法,这里 是原文地址。1
2
3
4
5
6
7
8
9
10
11
12
13
14
15
16
17
18
19
20
21
22
23
24
25
26
27
28
29
30
31
32
33
34
35
36
37
38
39
40
41
42
43
44
45
46
47
48
49
50
51
52
53
54
55
56
57
<html>
<head lang="en">
<meta charset="UTF-8">
<meta http-equiv="X-UA-Compatible" content="IE=edge">
<meta name="viewport" content="width=device-width, initial-scale=1">
<title>bootstrap fixed footer demo</title>
<link rel="stylesheet" href="css/bootstrap3/bootstrap.min.css">
<script type="text/javascript" src="js/jquery.js"></script>
<script type="text/javascript" src="js/bootstrap.js"></script>
<style type="text/css">
* {
margin: 0;
}
html, body {
height: 100%;
}
.wrapper {
min-height: 100%;
height: auto !important;
height: 100%;
margin: 0 auto -6em;
}
/*push和footer的高度不一样是因为加了一条hr*/
.push {
height: 6em;
}
.footer, {
height: 4em;
}
</style>
</head>
<body>
<div class="wrapper">
<div class="container">
<p>这里是内容</p>
</div>
<div class="push"></div>
</div>
<footer class="footer">
<div class=" col-lg-12 text-center">
<hr>
<p>Copyright © zhangjk 2015</p>
</div>
</footer>
</body>
</html>
服务端实现
平台及语言
服务器使用的新浪的sae,语言是使用的php。
php restful service
因为应用逻辑非常简单,就是一个存和取数据,所以简单的实现了几个restful的接口,并没有使用专门的框架(主要是对php不熟悉)。接口的实现参考自这篇文章,下面是该文章给出的代码:1
2
3
4
5
6
7
8
9
10
11
12
13
14
15
16
17
18
19
20
21
22
23
24
25
26
27
28
29
30
31
32
33
34
35
36
37
38
39
40
41
42
43
44
45
46
47
48
49
50
51
52
53
54
55
56
57
58
59
60
61
62
63
64
65
66
67
68
69
70
71
72
73
74
75
76
77
78
79
80
81
82
83
84
85
86
87
88
89
90
91
92
93
94
95
96
97
98
99
100
101
102
103
104
105
106
107
108
109
110
111
112
113
114
115
116
117
118
119
120
121
122
123
124
125
126
127
128
129
130
131
132
133
134
135
136
137
138
139
140
141
/*
API Demo
This script provides a RESTful API interface for a web application
Input:
$_GET['format'] = [ json | html | xml ]
$_GET['method'] = []
Output: A formatted HTTP response
Author: Mark Roland
History:
11/13/2012 - Created
*/
// --- Step 1: Initialize variables and functions
/**
* Deliver HTTP Response
* @param string $format The desired HTTP response content type: [json, html, xml]
* @param string $api_response The desired HTTP response data
* @return void
*
*/
function deliver_response($format, $api_response) {
// Define HTTP responses
$http_response_code = array(
200 => 'OK',
400 => 'Bad Request',
401 => 'Unauthorized',
403 => 'Forbidden',
404 => 'Not Found'
);
// Set HTTP Response
header('HTTP/1.1 ' . $api_response['status'] . ' ' . $http_response_code[$api_response['status']]);
// Process different content types
if (strcasecmp($format, 'json') == 0) {
// Set HTTP Response Content Type
header('Content-Type: application/json; charset=utf-8');
// Format data into a JSON response
$json_response = json_encode($api_response);
// Deliver formatted data
echo $json_response;
} elseif (strcasecmp($format, 'xml') == 0) {
// Set HTTP Response Content Type
header('Content-Type: application/xml; charset=utf-8');
// Format data into an XML response (This is only good at handling string data, not arrays)
$xml_response = '<?xml version="1.0" encoding="UTF-8"?>' . "\n" . '<response>' . "\n" . "\t" . '<code>' . $api_response['code'] . '</code>' . "\n" . "\t" . '<data>' . $api_response['data'] . '</data>' . "\n" . '</response>';
// Deliver formatted data
echo $xml_response;
} else {
// Set HTTP Response Content Type (This is only good at handling string data, not arrays)
header('Content-Type: text/html; charset=utf-8');
// Deliver formatted data
echo $api_response['data'];
}
// End script process
exit;
}
// Define whether an HTTPS connection is required
$HTTPS_required = FALSE;
// Define whether user authentication is required
$authentication_required = FALSE;
// Define API response codes and their related HTTP response
$api_response_code = array(
0 => array(
'HTTP Response' => 400,
'Message' => 'Unknown Error'
) ,
1 => array(
'HTTP Response' => 200,
'Message' => 'Success'
) ,
2 => array(
'HTTP Response' => 403,
'Message' => 'HTTPS Required'
) ,
3 => array(
'HTTP Response' => 401,
'Message' => 'Authentication Required'
) ,
4 => array(
'HTTP Response' => 401,
'Message' => 'Authentication Failed'
) ,
5 => array(
'HTTP Response' => 404,
'Message' => 'Invalid Request'
) ,
6 => array(
'HTTP Response' => 400,
'Message' => 'Invalid Response Format'
)
);
// Set default HTTP response of 'ok'
$response['code'] = 0;
$response['status'] = 404;
$response['data'] = NULL;
// --- Step 2: Authorization
// Optionally require connections to be made via HTTPS
if ($HTTPS_required && $_SERVER['HTTPS'] != 'on') {
$response['code'] = 2;
$response['status'] = $api_response_code[$response['code']]['HTTP Response'];
$response['data'] = $api_response_code[$response['code']]['Message'];
// Return Response to browser. This will exit the script.
deliver_response($_GET['format'], $response);
}
// Optionally require user authentication
if ($authentication_required) {
if (empty($_POST['username']) || empty($_POST['password'])) {
$response['code'] = 3;
$response['status'] = $api_response_code[$response['code']]['HTTP Response'];
$response['data'] = $api_response_code[$response['code']]['Message'];
// Return Response to browser
deliver_response($_GET['format'], $response);
}
// Return an error response if user fails authentication. This is a very simplistic example
// that should be modified for security in a production environment
elseif ($_POST['username'] != 'foo' && $_POST['password'] != 'bar') {
$response['code'] = 4;
$response['status'] = $api_response_code[$response['code']]['HTTP Response'];
$response['data'] = $api_response_code[$response['code']]['Message'];
// Return Response to browser
deliver_response($_GET['format'], $response);
}
}
// --- Step 3: Process Request
// Method A: Say Hello to the API
if (strcasecmp($_GET['method'], 'hello') == 0) {
$response['code'] = 1;
$response['status'] = $api_response_code[$response['code']]['HTTP Response'];
$response['data'] = 'Hello World';
}
// --- Step 4: Deliver Response
// Return Response to browser
deliver_response($_GET['format'], $response);
对于apache服务器,需要修改一下.htaccess文件,该成下面的形式1
2
3
4
5
6# Turn on the rewrite engine
Options +FollowSymlinks
RewriteEngine on
# Request routing
RewriteRule ^([a-zA-Z_-]*)\.(html|json|xml)?$ index.php?method=$1&format=$2 [nc,qsa]
其中RewriteRule部分是指将[a-zA-Z_-]*匹配到的字符串赋值到 $1 的位置,将(html|json|xml)?匹配的字符串赋值到 $2 的位置,访问 hello.json 就相当于访问 index.php?method=hello&format=json。
在sae中,使用的服务器也是apache,不过它不能更改.htaccess文件,而是需要修改config.yaml文件,如果使用git方式管理代码,默认是不会将该文件下载到本地的,所以推荐使用svn方式管理代码,下面是具体配置1
2
3
4
5name: appname
version: 1
handle:
-rewrite: if(!is_dir() && !is_file() && path ~ "^([a-zA-Z_-]*).(html|json|xml)?$") goto "index.php?method=$1&format=$2"
信息存储–memcache
这里存储没有使用数据库,而是使用的memcache,主要是信息只是短期存储,并且数据量不会太大。官方对memcache的使用解释的并不是十分详细,这里主要参考了 这篇文章 ,下面是具体的代码:1
2
3
4
5
6
7
8
9
10
11
12
13
14
15
16
17
18
19
20
21
22
23
24
25
26
27
28
29
30
31
32
33
34
35
36
//连接
$mem = memcache_init();
//保存数据
$mem->set('key1', 'This is first value', 0, 60);
$val = $mem->get('key1');
echo "Get key1 value: " . $val . "<br />";
//替换数据
$mem->replace('key1', 'This is replace value', 0, 60);
$val = $mem->get('key1');
echo "Get key1 value: " . $val . "<br />";
//保存数组
$arr = array('aaa', 'bbb', 'ccc', 'ddd');
$mem->set('key2', $arr, 0, 60);
$val2 = $mem->get('key2');
echo "Get key2 value: ";
print_r($val2);
echo "<br />";
//删除数据
$mem->delete('key1');
$val = $mem->get('key1');
echo "Get key1 value: " . $val . "<br />";
//清除所有数据
$mem->flush();
$val2 = $mem->get('key2');
echo "Get key2 value: ";
print_r($val2);
echo "<br />";
//关闭连接
$mem->close();
其中$mem->set的第四个参数就是数据的有效期,单位是秒。
ajax跨域访问
为了使服务端允许客户端的ajax跨域请求,需要在php代码中加上下面的代码。1
header('Access-Control-Allow-Origin:*');
前端使用jquery 的 $.ajax 发送ajax请求,在IE10及以上的版本中,工作正常,但是IE9及以下的版本无法正确访问,找了半天也没有找到好的解决方法。索性就在sae上放了一个同样的应用首页,如果使用IE9及以下的浏览器,可以访问那个页面。